
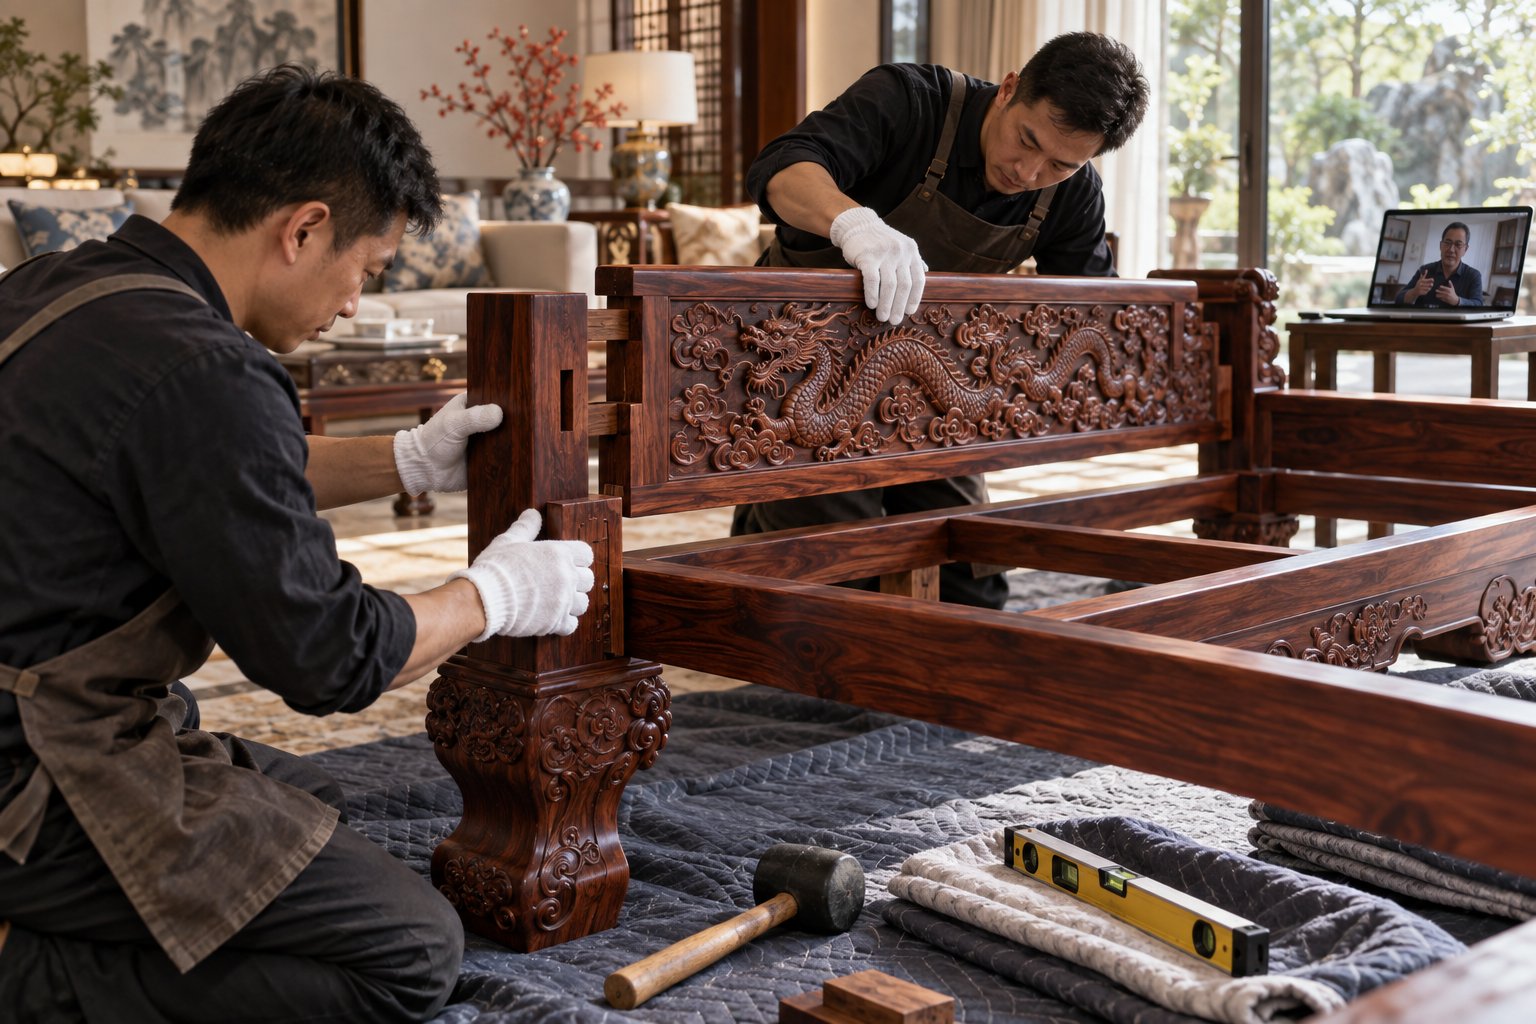
Практическое руководство от производителя по установке импортированной мебели из розового дерева за рубежом: что включает удалённое руководство по установке от Yunxiao, как проходит день удалённой установки, каких распространённых ошибок избегать и когда стоит сочетать удалённое сопровождение с работой местных бригад.
When a full container of solid rosewood furniture finally arrives at a villa in Melbourne, a hotel lobby in Kuala Lumpur, or a showroom in Toronto, the most stressful part of the whole project is often not the production or the shipping. It is the moment the crates are opened and somebody has to turn carefully packed components back into finished rooms. Carved sofa sets, extending dining tables, four-poster beds and display cabinets are heavy, valuable and assembled with traditional joinery rather than metal hardware, so many overseas buyers ask us the same practical question before they place a container order: how does remote installation guidance actually work, and can our local team really assemble everything correctly without a Chinese technician on site?
This article answers that question in detail from the perspective of our factory. We will walk through why rosewood furniture installation is different from assembling flat-pack or veneered furniture, what our remote installation guidance package includes, how a typical remote installation day unfolds, which mistakes we see most often and how to avoid them, and when it makes sense to combine remote support with local professional help. Everything described here reflects the services we genuinely provide to wholesale buyers, hotels, designers and distributors across Europe, North America, Australia and Southeast Asia.
Why Is Installing Imported Rosewood Furniture Different from Ordinary Furniture Assembly?
Buyers who have experience with mass-market furniture sometimes underestimate what is involved when a container of classical Chinese furniture arrives. The difference is not only the value of the goods; it is the construction method, the weight, and the sensitivity of the material itself.
Solid hardwood behaves like a living material
Every piece we ship is made from solid tropical hardwood — dense Siamese rosewood and other grade-A timbers — that has been dried in our constant-humidity kilns for thirty-six days before processing. Even properly dried solid wood continues to exchange moisture with the air around it. A board that leaves Xianyou County at a stable moisture content will slowly adjust to a humid coastal climate in Southeast Asia or a heated, dry interior in North America. This movement is normal and our joinery is designed to accommodate it, but it means installation decisions matter: where the furniture is placed, how quickly it is unpacked, and how the room's humidity is managed during the first weeks all influence how gracefully the wood settles.
Veneered panel furniture, by contrast, is dimensionally stable but structurally disposable. If a veneered cabinet is scratched or a panel swells, it usually cannot be repaired meaningfully. Solid rosewood furniture can be refinished, re-waxed and re-loved for generations, but only if it is installed and handled correctly from day one. That is exactly why we treat installation guidance as part of the product, not an afterthought.
Traditional joinery replaces screws with engineering
Our furniture is assembled using mortise-and-tenon joinery, wooden dowels and floating-panel construction. Primary frames contain no metal hardware, which is a deliberate choice: metal fasteners locked into moving hardwood are a common cause of splitting and deformation as the timber expands and contracts across seasons. The consequence for installation is important — most components are designed to be joined by fitting, alignment and sometimes gentle tapping with a mallet, not by driving screws into pre-drilled holes.
This confuses installers who expect an IKEA-style instruction sheet and a bag of bolts. A tenon must enter its mortise in the correct orientation; a floating panel must be seated so it can continue to move; a bed's corner posts are often single solid sections that define the geometry of the whole frame. None of this is difficult for a trained crew, and it is entirely learnable remotely, but it does mean that the guidance we provide is structural coaching rather than a parts list.
The value and finish demand careful handling
Each finished surface carries multiple hand-rubbed coats of traditional raw lacquer or an eco-friendly beeswax finish that complies with EU REACH and US CARB expectations. These finishes are durable and repairable, but a careless forklift fork, a dragging crate or an unprotected corner can still leave a mark that requires professional refinishing. Carved aprons, dragon and phoenix motifs, lattice doors and inlaid stone tops also create irregular shapes that do not stack or slide the way flat panels do. During installation, every component should be handled the way a museum handles a loaned object: padded, lifted — never dragged — and moved by at least two people.
What Exactly Is Included in Yunxiao's Remote Installation Guidance?
Remote installation guidance is one of the standard services we extend to our B2B partners. It is included because a factory that has spent forty-five to sixty working days producing a container order has a strong interest in seeing that order installed properly. When buyers ask what the service actually contains, we describe it in five layers.
1. Free project layout drawings before production
Guidance begins long before the furniture ships. For villa, resort and hotel projects we prepare free layout drawings based on the buyer's floor plans and room dimensions. These drawings do two jobs at once. First, they confirm that each set — a nine-seat imperial dragon carved sofa group, a twelve-seat banqueting table, a five-piece four-poster bedroom suite — actually fits the space with sensible circulation paths, before a single log is cut. Second, they become the installation map: every item has a planned position, so the on-site team is not improvising while heavy pieces are already out of their crates.
Many buyers tell us this step alone prevents the most expensive mistake in furniture projects: discovering after delivery that a sofa cannot turn the corner of a staircase, or that a display cabinet blocks a window that was supposed to stay clear. Because we build to order with flexible OEM and ODM sizes, correcting a dimension at the drawing stage costs nothing; correcting it after shipping costs a fortune.
2. Component maps and installation sequences for every set
With each order we document how each set breaks down into components and the correct order in which those components come back together. A carved sofa set, for example, is documented arm by arm and rail by rail; a wardrobe is documented as carcass, carved panel doors, floating internal shelves and top crown. The documentation uses photographs of the actual pieces in your order, not generic catalogue images, so your installers can match every numbered component to its position without guesswork.
The sequence matters as much as the parts list. Joining a frame in the wrong order can make a tenon unreachable or force a rail against a carved apron. Our sequences are written by the same workshop teams that assemble each set for final inspection before packing, so the person explaining "fit the left rear rail before seating the seat panel" is the person who has done it hundreds of times.
3. Video call support during installation
When the container arrives and your team starts work, we schedule live video calls with our installation technicians. In practice this works like having a workshop supervisor standing virtually beside the crew. The local team unpacks, lays out components according to the map, and we guide the critical moments in real time: how to orient a mortise before tapping it home, how much force is normal, how to protect carved edges while rolling a cabinet into position, and how to check that a bed frame sits square before the slats and headboard go on.
Most containers we ship are installed with two to four supported sessions of one to two hours each, spread across the installation days. Time zones are rarely a problem: because we serve Southeast Asia, Australia, Europe and North America, we are used to scheduling calls in the buyer's working hours, and our team keeps flexible evening shifts during peak installation periods.
4. Recorded reference videos and photo guides
Live calls are complemented by recorded material. For repeat models — the Ming-style round dining table, the three-piece carved sofa set, the canopy bed — we maintain reference videos showing the full assembly from crate to finished piece. Buyers receive these with their order so the local team can watch the process once before starting, then keep them as a training resource for future installations. Photo guides annotate the specific carved details of your order: which apron faces the front, where the numbering is located, how the inlaid stone top is seated on its frame.
5. Aftercare and climate acclimatization advice
Installation is not finished when the last tenon is seated. Our guidance package includes the acclimatization and first-month care routine: how long to let pieces rest before final positioning, what room humidity range to maintain, how to care for the beeswax or raw-lacquer finish during the settling period, and what normal seasonal movement looks like so that nobody panics when a drawer's action changes slightly between a humid summer and a dry winter. This advice is the same we would give a customer standing in our own showroom, delivered in writing so it stays with the project team.
What Should Buyers Prepare Before the Container Arrives?
Remote installation works best when the receiving side is organized. Based on hundreds of deliveries, here is the preparation checklist we recommend to every B2B buyer. None of it requires special skill — just planning.
Confirm the delivery route and staging space
Before the container arrives, walk the route from the truck to the final room. Measure doorways, corridor widths, elevator interiors, stair turns and any low ceilings. Remember that a carved wardrobe or a twelve-seat dining table is not only long: with protective crating it can be taller and wider than the finished piece. If a component cannot physically reach the room, the solution must be found before installation day — sometimes that means unpacking in a larger staging area and carrying components in, which our component maps are designed to support, and sometimes it means we adjust a dimension at production stage because you told us early.
Organize the crew and the tools
A typical room of rosewood furniture needs four to six people for the heavy lifting, plus one person who follows the documentation and coordinates the video call. The tool list is short — this surprises buyers used to hardware-heavy furniture: furniture blankets or moving pads, a rubber mallet, a spirit level, a tape measure, screwdrivers only for the few transport-fixing points, clean cotton gloves for finished surfaces, and the humidity monitoring you already use in the room. Because our frames join without metal hardware, there are no bolt bags to lose and no torque specs to follow; the craft is alignment, not force.
Prepare the room environment
Have the room at its normal living condition before installation. If the building is newly plastered or freshly concrete-floored, let it dry first — fresh concrete releases moisture for months and will pull humidity out of or push it into the wood unevenly. Check that flooring is level; a four-poster bed or a long banqueting table on an uneven floor will rack slightly, which is visible in gaps at the joints. Most minor unevenness can be corrected with furniture-leveling feet or thin shims during installation, and we explain how in the guidance.
Schedule the unpacking-to-installation window
We advise unpacking and installing within a few days of each other. Components should not sit wrapped in plastic crates for weeks in a hot corridor, because the wood needs to breathe with the room it will live in. Equally, do not unpack everything at once and leave carved pieces exposed in walkways for days. The rhythm that works: unpack one room at a time, install it, then move to the next.
How Does a Typical Remote Installation Day Unfold?
To make this concrete, here is how a standard installation session usually runs for a villa or hotel project, based on the workflow our technicians follow on video calls.
Morning: staging and inspection
The crew opens the crates in the staging area, checking each component against the component map as it emerges. Any transport damage — rare, thanks to our custom crating, moisture barriers and bracing, but never impossible — is photographed immediately and sent to us while the video call is scheduled. Early discovery keeps options open: a scratched corner can often be waxed or touched up locally; a genuinely damaged component is handled through our after-sales process. Checking at staging time, before pieces are moved into rooms, prevents the worst scenario of finding damage during final positioning.
Midday: frame assembly with live guidance
Frames go together first, on padded blankets on the floor, before any piece stands upright. For a carved sofa set, the crew builds the base frame, seats the seat panels, then adds arms and back rails with the technician watching orientation on camera. The most common coaching point at this stage is force: a well-made joint needs firm but not violent pressure, and if a tenon resists, the answer is to check orientation and alignment, never to hit harder. Our technicians show the mallet angle and the padded striking points on camera, and the local crew usually gains confidence within the first hour.
Afternoon: standing, leveling and positioning
Once frames are joined, pieces are lifted upright and moved to their positions from the layout drawings. Heavy cabinets travel on furniture dollies with protective pads, and carved corners get extra padding because they are exactly the height of most doorway edges. Each piece is leveled; long tables and bed frames are checked for squareness by measuring diagonals. This is also the moment to verify clearances — door swing, chair pull-back at dining tables, walkway widths — against the layout drawing, and to make small adjustments while everything is still mobile.
Close: first care pass and documentation
At the end of the session the technician walks through the first care routine on camera: wiping finished surfaces with the recommended cloth, checking that doors and drawers operate freely, noting any joint that needs re-checking after the first weeks of acclimatization. The session is summarized in writing to the buyer, with photos of completed rooms where the buyer agrees. Many distributors use these photos for their own showroom and client presentations — with our consent, which we are generally happy to give for genuine project documentation.
What Are the Most Common Installation Mistakes — and How Do We Help You Avoid Them?
Across years of guiding overseas installations, the same handful of mistakes accounts for most of the problems we see. None of them happens when the preparation checklist is followed, which is precisely why we invest in guidance.
Forcing a joint that is simply misaligned
The single most common error: an installer treats a snug mortise-and-tenon like a stubborn screw and applies serious force, damaging a carved rail. The correct response is always to stop, check orientation against the component map, sight down the joint to see whether the tenon is straight, and only then continue. On video calls we would rather spend ten minutes confirming orientation than see one cracked apron. Buyers should brief their crews on this rule before the first joint is attempted.
Dragging pieces across floors
Even on smooth floors, dragging a heavy cabinet stresses its joints and can scar both floor and furniture. Everything heavy is lifted or dollied — always with two or more people, always with padding between the piece and any hard surface. This sounds obvious, but it is the most frequent cause of the cosmetic damage we are asked about, and it is entirely preventable.
Ignoring floor levelness
An unlevel floor quietly damages tall pieces over time. A wardrobe leaning a few millimeters puts constant twist into its carcass; a dining table rocking on one leg loosens the perception of quality even when the joinery is perfect. Leveling every piece during installation takes minutes and pays for the whole project. Where floors are genuinely uneven, shims or adjustable feet are the answer, and we advise which approach suits each piece type.
Placing furniture against hostile microclimates
Solid wood furniture should not stand against a radiator, directly in front of an air-conditioning vent, in a spot of daily direct sunlight, or against a wall with a known damp problem. These microclimates create one-sided drying or moisture pickup, which is the real enemy of any natural wood — not the climate itself. During layout review we flag these placements in the drawings, and installers should keep the ten-to-fifteen-centimeter breathing gap between large pieces and exterior walls that our care guide recommends.
Skipping the acclimatization period
Some buyers want every drawer adjusted to perfection on day one. We advise a little patience: let the furniture live in the room for two to four weeks, then do the final fine adjustment of doors and drawer alignment once the wood has settled. Our joinery is built to stay stable through seasonal movement, and the small adjustments made after settling stay adjusted.
How Does Remote Guidance Compare with Hiring Local Installers?
Buyers in North America and Europe sometimes ask whether they should simply hire a local furniture installation company instead. Our honest answer: for most projects, the best result comes from combining both — a local crew for handling and our technicians for the joinery-specific coaching — and here is the reasoning.
What local crews do well
Local professional movers and installers excel at logistics: safe transport from the port or warehouse, carrying heavy components, protecting floors and doorways, and positioning pieces precisely. These are exactly the competencies we recommend outsourcing to experienced local hands, especially for projects above ground floor or with difficult access.
What only the factory knows
What no local crew can know in advance is the specific logic of classical Chinese joinery: why this rail must be fitted before that panel, how a floating panel must be seated, what the correct joint tolerance feels like, and how the carved details of a particular set influence handling. This is where our remote installation guidance carries the project. A local crew that follows our component maps, watches the reference video, and takes direction from our technician on a video call routinely produces installations indistinguishable from factory assembly.
The economics favor the combined approach
Flying a Chinese installation team overseas is possible for very large hotel projects, and we have done it, but for most container orders the cost is disproportionate to the benefit when remote support exists. Buyers who compare quotes will find that the combined approach — local handling crew plus factory remote guidance included in the order — delivers a professional result at a fraction of the cost of full on-site international support. That is why we built the remote service as a standard offering rather than an upsell.
When Does On-Site Support Become Necessary?
We believe in being honest about the limits of remote guidance. There are situations where we recommend escalating beyond video calls.
- Very large hospitality installations with dozens of rooms, where the schedule pressure of a hotel opening justifies a dedicated installation team on site, working alongside local contractors.
- Projects with unusual site conditions — heritage buildings with protected staircases, installations involving cranes through windows, or rooms whose measurements changed after production was confirmed. These benefit from advance engineering rather than real-time coaching.
- Repeat dealer programs where a distributor wants us to train their own permanent installation team once, in depth, so that subsequent containers need no support at all. We are glad to run these training sessions remotely and to certify a dealer's crew after they have completed several guided installations.
For the majority of orders — a villa, a showroom, a restaurant, a residential whole-house project — remote installation guidance plus a competent local crew is fully sufficient, and that is what we recommend by default. Trial single sets and refundable samples also give first-time buyers a low-risk way to test the entire process, including installation, before committing to a full container.
What Do Buyers Frequently Ask About Rosewood Furniture Installation?
Do we need any special tools to assemble mortise-and-tenon furniture?
No power tools are needed for the primary frames. A rubber mallet, a spirit level, a tape measure, protective blankets and clean cloths cover nearly everything. Screwdrivers are used only for transport-fixing points that are removed during unpacking. If any component in a custom order genuinely requires a fastener, it is documented specifically in that order's guide.
How long does installation take for a full container?
A typical mixed container covering a living room, dining room and two bedrooms takes a professional crew two to three working days with remote support, including unpacking, assembly, positioning and the first care pass. Larger hotel projects scale with room count. Scheduling two to four video sessions across those days is normally enough.
What if a component is damaged during shipping or installation?
Photograph it immediately, keep all packaging, and contact us the same day. Our export packing with custom crating, moisture barriers and bracing is engineered specifically for relief-carved pieces, so damage is rare, but when it happens our after-sales process covers assessment, replacement parts for joinery components, and finishing guidance for cosmetic repairs. The after-sales and warranty framework for B2B orders is documented separately and applies from the moment of discovery.
Will the joints loosen over time in my climate?
Properly dried timber and well-cut joinery are designed for seasonal movement, which is why our process includes thirty-six days of constant-humidity drying before construction and assembly without primary-frame metal nails. Furniture installed with correct leveling and reasonable room humidity — not against radiators or vents — remains tight through the seasons. Minor seasonal changes in drawer action are normal and reversible with the room's humidity.
Can you guide installation for custom OEM and ODM pieces we designed?
Yes. Custom sizes and patterns are documented the same way as catalog models: component maps, installation sequence, and video support, all built around the actual pieces produced for your order. Because our design and production teams develop custom pieces together, the documentation reflects exactly how the piece was engineered, including any project-specific features.
Does the guidance cover moving the furniture later, after installation?
It can. Solid rosewood furniture can be disassembled and reassembled by trained hands — that is one of the quiet advantages of traditional joinery over glued panels. If a buyer expects to relocate pieces in the future, we note the disassembly points during the initial documentation and can run a refresher video session before a planned move.
Why We Treat Installation as Part of the Product
Since 2008, our factory in Xianyou County, Fujian — the hometown of traditional hardwood craft — has shipped classical rosewood furniture to wholesalers, hotels and designers on four continents. Over those years we have learned a simple truth: the buyer's experience of our furniture is shaped at least as much by installation day as by production quality. A superbly built sofa set installed roughly can disappoint; an ordinary order installed with care delights.
That is why remote installation guidance sits alongside our other standard B2B services — full export documentation, FSC chain-of-custody certificates and CITES export permits where applicable, ISPM 15 heat-treated packaging, partial shipments for long-term partners, free layout drawings for projects, refundable samples and trial single sets. Together these services exist for one purpose: to make sure that what we build in Xianyou becomes, on the other side of the ocean, exactly what your project imagined.
If you are planning a villa, hotel, restaurant or wholesale program and want to understand precisely how installation would work for your project, send us your floor plan and requirements. Our team will prepare the layout drawings, walk you through the installation workflow, and show you reference videos from comparable sets — so that by the time your container is on the water, installation day already has a plan.
How Should Installation Plans Differ Across Southeast Asia, Australia and North America?
Our buyers operate in very different climates, and the same container installed in three different regions will need three slightly different conversations. Because we ship to all of these markets regularly, our technicians keep regional considerations in mind during every guidance session.
Humid tropical climates: Southeast Asia
In Malaysia, Singapore, Indonesia, the Philippines and coastal Vietnam, the dominant factor is sustained humidity, often above eighty percent during monsoon months. Solid rosewood is comfortable in this range — tropical hardwoods spent their lives in similar air — but two practical points matter. First, air-conditioned interiors create a daily humidity swing between the cool, dry daytime room and the warmer, more humid evening; keeping the air-conditioning pattern reasonably consistent, especially in the first weeks after installation, helps the wood settle predictably. Second, ventilation gaps matter even more in the tropics: leaving the recommended breathing space behind cabinets and wardrobes prevents moisture from pooling against exterior walls during the rainy season. Installers in this region should also be extra careful with bare hands on finished surfaces, because humidity and perspiration combine to leave marks that wax finishes show readily — clean cotton gloves, which our checklist already includes, solve this completely.
Dry and heated interiors: North America and Northern Europe
The opposite challenge appears in heated homes across Canada, the northern United States and continental Europe: winter indoor humidity can drop below thirty percent, especially with forced-air heating. Hardwood that dried to a stable moisture content for its origin will gradually give up moisture in this environment, and the visible effect is usually small shrinkage — slightly tighter drawer action or a hairline gap at a floating panel edge during the driest weeks. Our joinery anticipates this, and the care guidance recommends a room humidifier set between roughly forty and sixty percent relative humidity, which benefits both the furniture and the occupants. Installation crews in these markets should pay particular attention to radiator placement: a carved sideboard standing directly above a hot-air register experiences one-sided drying that no joinery can fully compensate. Moving the register deflector or the furniture by half a meter is a five-minute task on installation day that prevents years of stress.
Variable coastal climates: Australia
Australian projects span both patterns — humid summers in Queensland, dry hot summers with cool damp winters in Victoria — and the acclimatization advice sits in the middle: let the furniture settle through one full season before judging joint behavior, keep it out of direct western sun through glass, and treat any seasonal movement as information rather than defect. Australian buyers also frequently install furniture in homes with polished timber floors, so floor protection during installation — blankets under every piece while it is maneuvered — is a coordination point we raise proactively with local crews.
What stays the same everywhere
Across every market, three principles do not change: unpack and install promptly rather than letting crates sit, follow the component map and the guided sequence rather than improvising, and level every piece before it is considered finished. The regional conversation adjusts the details around these constants.
A Case Example: How a Distributor's Team Installed a Villa Order Remotely
To show how this works end to end, consider a representative project — a private villa order handled by one of our long-term distributor partners, reconstructed here from the actual workflow without naming the client.
The order covered a complete residence: a Ming-style living room sofa group, a rectangular carved dining table set for eight, a four-poster canopy bed suite with wardrobe and dresser, plus a display cabinet for the entrance hall. Production took the standard forty-five to sixty working days window after the deposit, with FSC chain-of-custody documentation and the applicable export permits prepared by our team alongside manufacturing.
Before production even started, the distributor sent us floor plans. Our design team returned layout drawings that caught one real problem: the planned position for the display cabinet sat under an air-conditioning vent, and the dining area drawing showed less pull-back clearance behind the chairs than the room actually allowed once the wall molding was measured. Two drawing revisions later, every position was confirmed, and the production dimensions were locked.
When the container arrived, the distributor's local crew — four movers plus a project coordinator — followed the preparation checklist. The staging area was a double garage; route measurements had been taken the previous week, and the only tight point, a ninety-degree stair turn to the bedrooms, was solved by unpacking bedroom components in the upstairs hallway rather than carrying assembled pieces up. Because the component map documented the bed as a disassembled frame, every bedroom component passed through the stair easily; the largest single item moved upstairs was a nightstand.
Installation ran across two and a half days with three scheduled video sessions. The first session covered staging inspection and the living room frame assembly; the technician on camera confirmed tenon orientation for the carved arm rails and demonstrated the padded mallet technique. The second session handled the dining set and the display cabinet, including seating the cabinet's lattice doors so the floating panels could move freely. The third session, a shorter one, covered the bedroom suite and a final walkthrough of every room: checking level, confirming door and drawer action, and reviewing the first-month care routine in writing. The coordinator photographed each finished room, and the distributor later used those photographs — with consent — in a private client presentation.
The total cost of remote support was zero beyond the order itself; the local crew was already booked for delivery handling. The villa owner reported no issues at the four-month mark, and the minor drawer adjustment suggested during the settling review was completed by the distributor's crew in minutes. This is the pattern we see repeatedly: when preparation, documentation and live coaching come together, distance from the factory simply stops mattering.
What Questions Should Buyers Ask Any Supplier About Installation Support?
Installation guidance varies enormously between suppliers, and buyers evaluating factories for container orders — whether ours or another's — benefit from asking concrete questions before committing. We encourage due diligence, so here is the checklist we would apply in the buyer's seat.
- Are layout drawings included for project orders, and at what stage? Drawings produced before production prevent dimension errors; drawings produced after shipping only document problems.
- Is the installation documentation based on the actual pieces in the order? Generic catalogue instructions rarely match custom sizes or specific carved sets.
- Who conducts the video support? Guidance from the workshop teams that assemble the furniture carries a depth that scripted call-center support cannot replicate.
- How many supported sessions are typical for a container order? A serious supplier should be able to describe a normal session count and scheduling approach rather than treating every call as exceptional.
- What happens if something is damaged at installation time? The after-sales pathway, response expectations and evidence requirements should be explained before the order, not after the incident.
- Does the supplier understand destination-climate differences? A factory that discusses humidity management for your specific market demonstrates it has done this before.
We answer all six questions with the specifics described throughout this article, and we are equally comfortable when buyers ask competing factories the same questions. Installation support quality is one of the clearest signals of whether a supplier has genuinely exported classical furniture at scale or is still learning the trade on your order.
A Short Glossary of Installation Terms for Rosewood Furniture
Because classical Chinese furniture uses vocabulary your local crew may never have encountered, our documentation includes a plain-language glossary. These are the terms that appear most often on video calls.
- Mortise and tenon: the structural joint where a projecting tongue (tenon) on one component fits into a matching cavity (mortise) on another. The backbone of traditional joinery; no nails or screws required.
- Floating panel: a panel set inside a frame groove without glue at the edges, so it can expand and contract with the seasons without cracking the frame.
- Apron: the shaped rail below a tabletop or seat, often carved — the dragon, cloud and bamboo motifs on our tables and chairs live here.
- Crown: the shaped top member of a wardrobe or cabinet, seated last and aligned to the carcass below.
- Lattice: the open geometric gridwork in cabinet doors, assembled from interlocking members rather than glued strips.
- Acclimatization: the settling period after installation during which solid wood adjusts to the room's humidity; final fine adjustments are made after it.
- Racking: the twist that develops in a frame standing on an uneven floor; prevented by leveling during installation.
Buyers are welcome to share this glossary with their installation crews ahead of delivery day. A shared vocabulary shortens every video session, because nobody spends call time translating terms when the tenon is already in the technician's hand on screen.